微信生态是几乎所有产品不可或缺的一部分,Authing 最新支持了微信小程序登录。至此,针对微信生态,Authing 共支持微信 PC 网页版扫码登录、微信内网页授权登录、微信小程序登录。如果你想:
- 了解如何接入微信 PC 扫码登录,可以访问Authing 相关文档。
- 了解如何接入微信内网页授权登录:可以查看这篇文章。
同时,Authing 还正在开发移动端的 SDK,将为给移动端开发者带来更好的开发体验。

为了理解 Authing 微信小程序授权的原理,需要区分整个流程中参与的四方:
- 微信服务器:保存用户的身份信息,包括昵称、头像等。
- Authing 服务器:和微信服务器进行交互,获取用户信息(此过程使用了非对称加密,完全安全,同时 Authing 会严格保护用户信息的隐私)。
- Authing 平台开发者:调用 Authing 提供的 SDK,不需要直接和微信服务器进行交互,因为这部分繁琐的过程 Authing 已经解决了。
- 终端用户:真正访问页面的用户,整个过程对 Authing 无感知,用户体验不会受到任何影响。
开启微信小程序登录功能
注册微信小程序开发账号
- 微信开放平台
- 如果需要获取用户手机号,需通过微信认证。
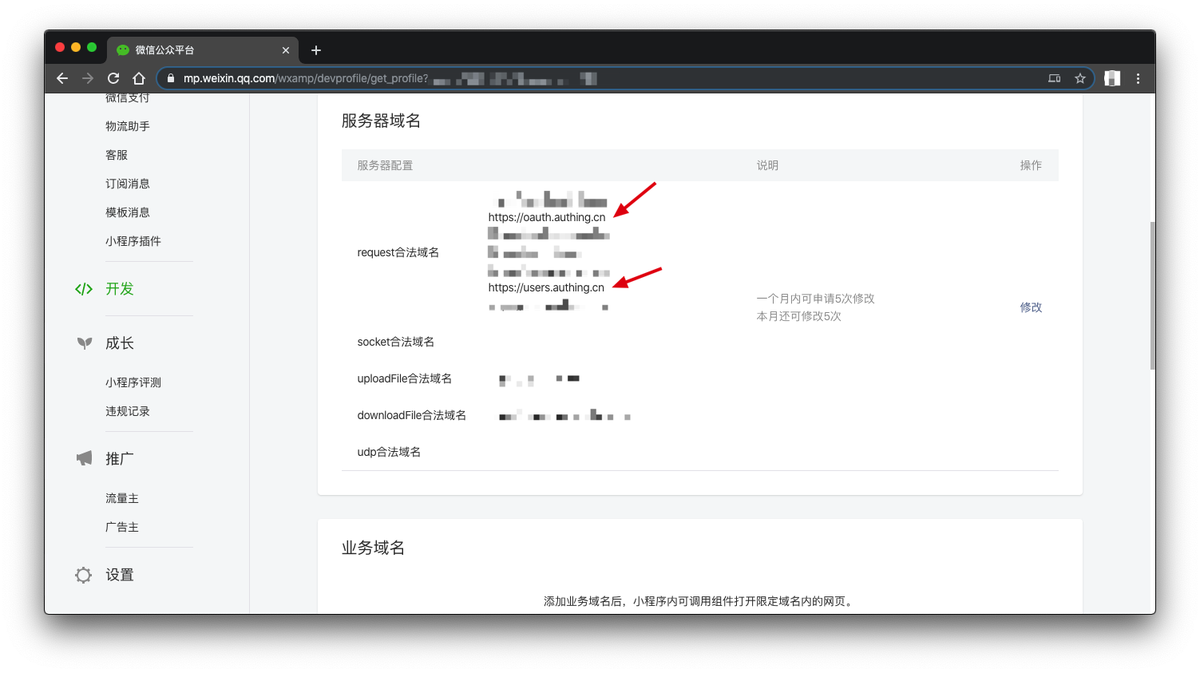
- 将oauth.authing,cn和users.authing.cn加入微信的服务器列表
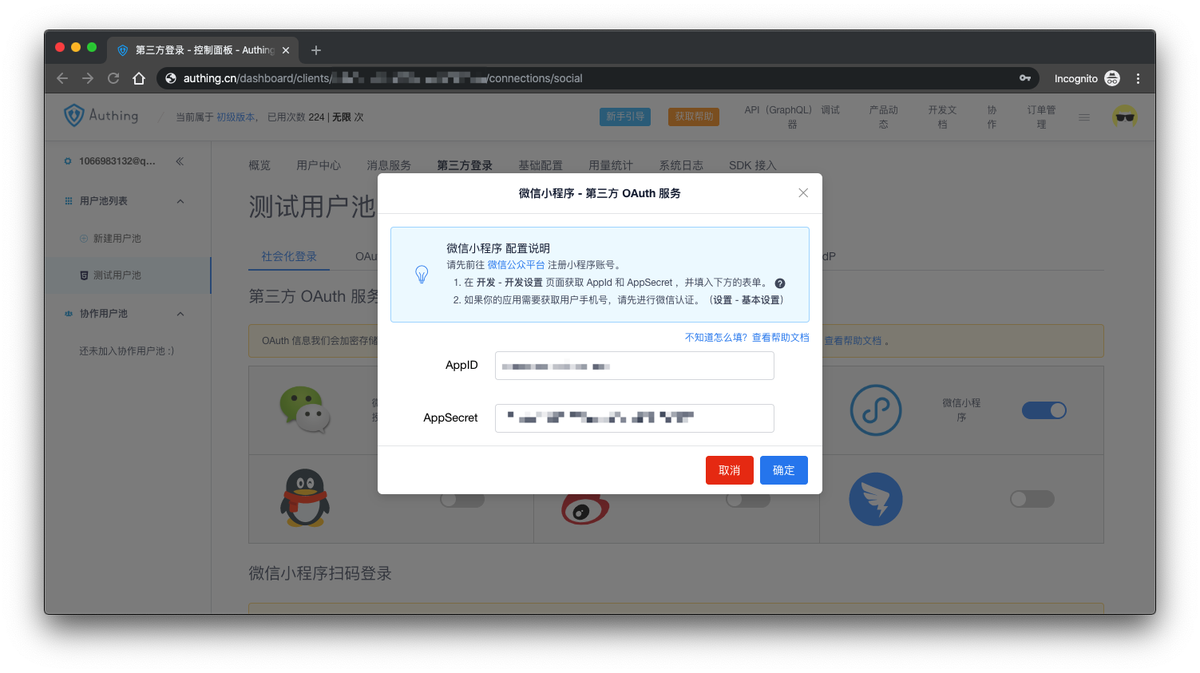
在 Authing 控制台开启微信小程序社会化登录
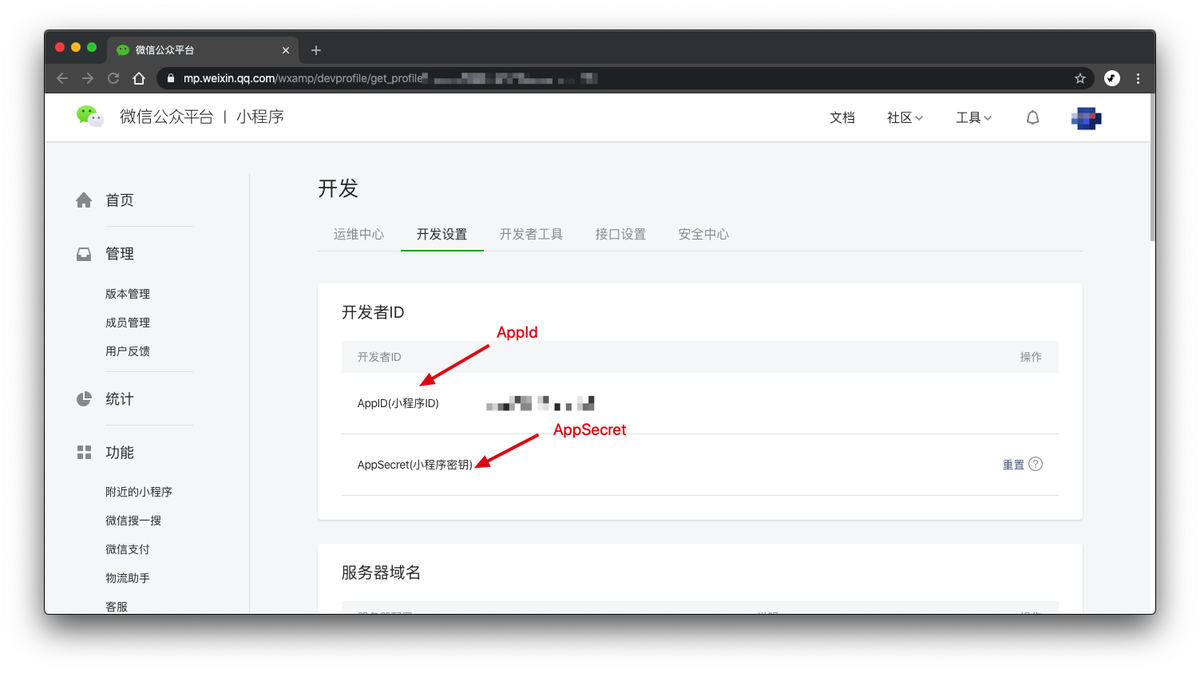
- 获取微信小程序 AppId 和 AppSecret
- 前往 Authing 控制台第三方登录->社会化登录->第三方OAuth
- 填入微信小程序的 AppId 和 AppSecret
开始使用
GitHub 地址:https://github.com/Authing/authing-wxapp-sdk
你可以克隆此项目用微信开发者工具打开,替换自己的小程序 AppId 和用户池 ID,就可以运行 Demo 了。
下载代码
git clonehttps://github.com/Authing/authing-wxapp-sdk
引入文件
然后将 repo 内的 authing 文件夹移动到你的项目目录下,之后使用 require 引入
const Authing = require('path/to/authing/authing.js');初始化用户池
如果你对 Authing 用户池这个概念不是很了解,可以查阅 Authing 官方文档:
const authing = new Authing({
  userPoolId: 'YOUR_USERPOOLID'
});
之后就可以调用其他的方法了,比如:
authing.login({
   email: "USER_EMAIL",
   password: "USER_PASSWORD"
}).then(userinfo => {
    this.setData({
        userinfo: userinfo,
    });
}).catch(err => {
    this.showDialog("登录失败!", err.message);
});
获取小程序的Code
Code 用来在小程序中执行微信登录,获取用户信息。
下面推荐一种如何处理Code 的最佳实践:
- 在 app 初次启动时判断微信登录态,如处于未登录态,调用wx.login()获取code并存入stroage:
// app.js
onLaunch: function() {
    console.log('App Launch');
    wx.checkSession({
        success(res) {
            console.log(res);
        },
        fail() {
            wx.login({
                success(res) {
                    const code = res.code;
                    wx.setStorageSync("code", code);
                }
            })
        }
    });
},
然后在每次页面加载时(page.onLoad),判断一下微信登录态,如如处于未登录态,重新调用wx.login()获取code并存入stroage:
// page.js
onLoad: function() {
    const self = this
    wx.checkSession({
        // 若丢失了登录态,通过 wx.login 重新获取
        fail() {
            wx.login({
                succes(res) {
                    const code = res.code;
                    wx.setStorageSync("code", code);
                }
            })
        }
    });
},
之后需要用到code的时候,使用下面的方法获取code,这样就能确保此code是最新的。
const code = wx.getStorageSync("code");使用微信授权登录:loginWithWxapp
注:当前小程序版本,第一次获取用户信息需要用户主动点击开放组件。授权通过之后,后续可以直接调用接口。
使用微信授权登录之前,需要先获取 code,请参考上文。
Authing 对微信授权协议进行了封装,使得开发者可以用几行代码实现使用微信身份登录。开发者只需要引导用户点击微信开放 button 组件,获取到点击事件e之后,将e.detail传给authing.loginWithWxapp方法即可。
<!-- example.wxml -->
<button open-type="getUserInfo" lang="zh_CN" bindgetuserinfo="onGotUserInfo">获取微信头像</button>
// example.js
onGotUserInfo: function(e) {
const self = this;
const code = wx.getStorageSync("code")
authing.loginWithWxapp(code, e.detail).then(userinfo => {
console.log(userinfo)
self.setData({
userinfo: userinfo,
})
}).catch(err => {
self.showDialog("操作失败", err);
});
},若用户之前同意过授权,不需要点击button就能直接获取,示例:
const self = this;

// 查看是否授权
wx.getSetting({
    success(res) {
        if (res.authSetting['scope.userInfo']) {
            // 已经授权,可以直接调用 getUserInfo 获取头像昵称
            wx.getUserInfo({
                success: function(res) {
                    const code = wx.getStorageSync("code");
                    authing.loginWithWeapp(code, res).then(userinfo => {
                        console.log(userinfo);
                        self.setData({
                                userinfo: userinfo,
                        });
                    }).catch(err => {
                        self.showDialog("操作失败", err);
                    })
                }
            });
        }
    }
});
获取并绑定用户手机号
调用此接口需小程序通过微信认证。
开发者可以使用此接口让用户绑定手机号,但是不能用于通过手机号登录或注册新用户,如果想通过手机验证码登录,需要调用loginByPhoneCode方法。
每次获取微信用户的手机号必须用户主动点击开放组件 button,且无主动调用 API。
Authing 对换取用户手机号的协议进行了封装,开发者只需要引导用户点击微信开放 button 组件,获取到点击事件e之后,将e.detail传给authing.bindPhone方法即可。示例:
//  example.wxml
<button open-type="getPhoneNumber" bindgetphonenumber="bindPhone">绑定手机号</button>
// example.js
bindPhone: function(e) {
const self = this;
console.log(e);
const code = wx.getStorageSync("code");
authing.bindPhone(code, e.detail).then(function(userinfo) {
// 此方法放回调的是最新的用户信息
console.log(userinfo);
self.setData({
userinfo: userinfo,
});
}).catch(function(err) {
self.showDialog("操作失败", err.message);
});
},修改头像
Authing 会自动处理打开相册、上传图片的逻辑,开发者只需要传入唯一的参数:userId即可,成功的回调函数会返回最新的用户信息。
// 需在登录状态下调用
changeAvatar: function() {
  const self = this;
  const userId = this.data.userinfo._id;
  authing.changeAvatar(userId).then(function(userinfo) {
    console.log(userinfo);
    self.setData({
      userinfo: userinfo,
    });
  }).catch(function(err) {
    console.log(err);
  });
},
其他接口
出于篇幅限制,这里只介绍了几个和微信小程序紧密联系的接口,其他使用邮箱登录、手机验证码登录、修改用户信息、重置密码等接口接口,与 Authing SDK for JavaScript保持一致,可以查阅相关文档进行了解。
目前微信小程序还不支持 async/await 语法,如果你想使用,需要自行搭建小程序的 ES6 环境。
如需了解错误代码的含义,请查看错误代码。